How To Fix A Burnt Voice Coil

Alright, gather 'round, folks. I've got a tale to tell about a time when my trusty old speaker decided to throw a tantrum. Picture this: I'm jamming out to my favorite tunes,...

Alright, gather 'round, folks. I've got a tale to tell about a time when my trusty old speaker decided to throw a tantrum. Picture this: I'm jamming out to my favorite tunes, singing along like a rockstar (well, in my head, I'm a rockstar), when suddenly, my speaker starts making this god-awful noise. It's like a cat being strangled, mixed with a deflating balloon. My heart sinks. My speaker, my faithful companion, has developed a case of the burnt voice coils.
What the Heck are Voice Coils?
Before we dive into the rescue mission, let's talk voice coils. They're the unsung heroes of your speakers, turning electrical signals into sound waves. Think of them as the vocal cords of your speaker. Now, imagine if you were to sing too loudly, too long, without a break. Your vocal cords would get tired, right? The same happens to voice coils when they overheat. They 'burn out', hence the term 'burnt voice coils'.
How Do You Know if Your Speaker's Voice Coils are Burnt?
Well, it's not like they'll call in sick. But there are signs. Your speaker might start sounding muffled, distorted, or you might hear that awful noise I mentioned earlier. It's like your speaker is trying to tell you, "Hey, I'm not feeling my best today."
Must Read
Now, before you go throwing your speaker out the window (which, by the way, is a terrible idea), let's see if we can fix this. Yes, you heard right. You can fix burnt voice coils. It's not as scary as it sounds, I promise.
Gather Your Tools, Soldier
First things first, you're gonna need some tools. Don't worry, we're not talking about a full-blown toolbox here. You'll need a screwdriver (usually a Phillips head), some tweezers, and a soldering iron. Oh, and don't forget your trusty multimeter. If you don't have one, now's a great time to invest. It's like a Swiss Army knife for electronics.
Safety First, Folks
Before we start, let's talk safety. You're gonna be dealing with electricity here, so make sure your speaker is unplugged and the battery is removed if it's a portable one. Also, don't forget to wear safety glasses. You don't want to be explaining to your friends why you've got a soldering iron burn on your forehead.
Let's Get Cooking
Alright, let's dive in. First, you'll need to disassemble your speaker. This usually involves unscrewing the back panel. It's like opening a present, except instead of a gift, you'll find a bunch of wires and a speaker driver. Isn't life exciting?
Once you're in, you'll see the voice coil. It's that spiral of wire you see on the speaker driver. If it's burnt, you'll see a dark, charred area. It's like the speaker's version of a sunburn. Now, here's where things get interesting. You've got two options: replace the voice coil or re-solder it.
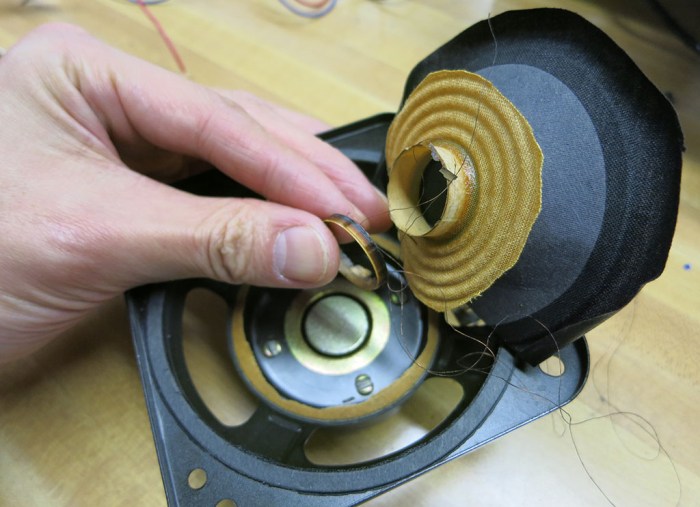 Burnt Speaker Teardown – New Screwdriver
Option 1: The Easy Way Out
Replacing the voice coil is like swapping out a tired old battery for a fresh one. It's straightforward, but it might be a bit pricier. You'll need to order a new voice coil that matches your speaker's model. Once you've got it, it's just a matter of desoldering the old one and soldering the new one in place. Easy peasy, lemon squeezy.
Option 2: The Frugal Route
Re-soldering the voice coil is like giving your speaker a second chance at life. It's cheaper, but it requires a bit more elbow grease. First, you'll need to clean the voice coil. You can use a cotton swab dipped in isopropyl alcohol to gently clean the charred area. Once it's clean, you'll need to re-solder the connection. This is where your multimeter comes in handy. You'll use it to test the voice coil's resistance and make sure it's still working.
Now, here's a fun fact for you. Did you know that gold is the best conductor of electricity? That's why it's often used in high-end audio equipment. So, if you're feeling fancy, you can use a gold-tipped soldering iron. Your speaker will thank you (well, not literally, but you get the idea).
Putting Humpty Dumpty Back Together Again
Alright, you've replaced or re-soldered the voice coil. Now it's time to put your speaker back together. This is where your multimeter comes in handy again. You'll use it to test the speaker and make sure everything's working properly. Once you've given it the all-clear, it's time to reassemble your speaker.
And there you have it, folks. Your speaker is as good as new. Well, almost new. It's had a bit of a makeover, but it's ready to rock again. Just remember to give it a rest every now and then. No one likes an overworked speaker (or a burnt-out voice coil, for that matter).
So, the next time your speaker starts making funny noises, don't panic. You're now a speaker whisperer. You can fix that. Just remember, safety first, and don't forget to turn the music down every once in a while. Your speaker (and your neighbors) will thank you.
