How To Cut Strawberries For A Fruit Tray

Let's be real. A fruit tray without perfect strawberries is a sad, sad thing. It’s like a party without music. We’re here to fix that. The Strawberry: A Spiky Little Drama Qu...

Let's be real. A fruit tray without perfect strawberries is a sad, sad thing. It’s like a party without music. We’re here to fix that.
The Strawberry: A Spiky Little Drama Queen
Strawberries are botanical liars. They aren’t even berries! Those little seeds on the outside? Those are the actual fruits. Each strawberry carries about 200 of them.
That’s a lot of tiny fruit armor. So, treat them with respect. They’re surprisingly fragile.
Must Read
Step One: The Shower (Not a Bath)
Never soak strawberries. They drink water like a sponge. You’ll end up with pale, watery mush.
Instead, give them a quick rinse under cool running water. Pat them dry gently with a towel. A dry strawberry is a happy strawberry.
Pro tip: Wet strawberries are slippery and dangerous. Your knife will thank you.
Step Two: The Hull of Shame
That green top is called a calyx. Fancy, right? But we just call it the leaf-hat. You need to remove it.
Grab a small paring knife. Don’t chop off the whole top! That’s a waste of delicious red real estate.
Instead, gently angle the knife and carve in a little cone shape under the green leaves. Pop it out. It feels weirdly satisfying. Like popping a pimple, but classier.
Step Three: Slice or Smash? (Just Slice)
Uniformity is the secret to a beautiful tray. You want every piece to look like it belongs. Chaos is for your cereal bowl.
For a classic look, slice your strawberries lengthwise from tip to base. Make them about ¼ inch thick. Not paper-thin. Not chunky-monkey thick.
You should get about three to five slices per berry. They should look like little red hearts in a row. Instant romance.
The Fan-Cut Trick (Total Show-off Move)
Want to blow minds? The strawberry fan is your weapon. It’s easier than it looks.
Don’t hull the berry all the way. Leave the leafy hat attached. Then, make thin, parallel cuts from the tip almost to the top.
Now, fan out the slices with your fingers. It looks like a tiny scarlet peacock. Guests will gasp. They might even applaud. You didn’t hear that from me.
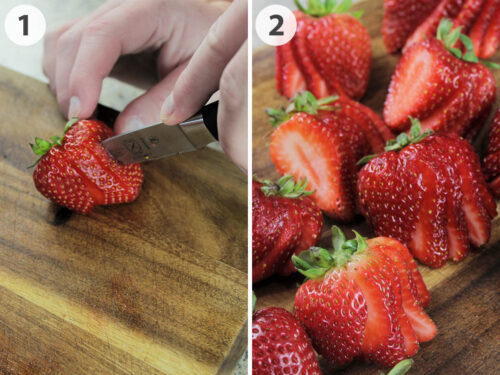 How To Make A Fruit Display - Homebody Eats
Banana Blades? Nope. Go Straight.
Never use a serrated knife for strawberries. It tears the delicate flesh. You’ll get ragged edges and lost juice.
Use a sharp, straight-edge paring knife. It glides through like butter. Clean cuts mean the berries look glossy and fresh for hours.
And for the love of all things sweet, don’t use a crinkle cutter. Those wavy edges are for kindergarten art projects, not fruit trays.
Timing is Everything
Cut strawberries right before serving. Seriously. Once cut, they start leaking juice and turn mushy within an hour.
If you cut them too early, you’re making strawberry soup. Nobody wants soup at a party. Unless it’s gazpacho. But that’s different.
Fun fact: A cut strawberry’s color actually darkens as it sits due to oxidation. It’s basically a tiny avocado. Sneaky, right?
The Layout: Pyramid Power
Don’t just dump them in a bowl. That’s lazy. Build a strawberry volcano.
Start with a base of larger slices. Stack smaller, fancier cuts on top. Create height. Create drama.
Surround them with blueberries for contrast. The deep blue next to the bright red is like a fireworks show in your mouth. Science says so (okay, I say so).
The Leftovers Dilemma
You will have leftover cut strawberries. You know this. Don’t toss them.
Toss them into your morning yogurt. Blend them into a smoothie. Or just eat them straight from the container at 2 a.m. No judgment.
Final secret: Sprinkle a tiny pinch of sugar on any leftover cut berries. It draws out the juice and makes a quick, dirty syrup. You’re welcome.
Now go forth. Slice. Fan. Conquer. Your fruit tray will be legendary. People will whisper your name in grocery stores. That’s the one who cuts straight.
