How To Consolidate Data From Multiple Ranges In Excel

Imagine you’re staring at a digital desk cluttered with multiple Excel sheets, each overflowing with sales figures, inventory lists, or survey responses. It feels like trying...

Imagine you’re staring at a digital desk cluttered with multiple Excel sheets, each overflowing with sales figures, inventory lists, or survey responses. It feels like trying to solve a puzzle with pieces scattered across different rooms. But here’s the fun part: Excel has a secret superpower called data consolidation that turns that chaos into a single, tidy summary. Whether you’re a spreadsheet newbie or a seasoned number-cruncher, this trick saves hours of manual copying and pasting. The purpose is simple: merge data from separate ranges—even from different workbooks—into one clean table. The advantages? Zero errors, instant updates, and a bird’s-eye view of your information. It’s like having a magical vacuum cleaner for your data mess!
Let’s start with the why this matters. Imagine you manage sales for three regions—North, South, and East. Each region has its own Excel sheet with monthly revenue in cells A1:B12. Manually summing them? That’s a recipe for typos and frustration. Consolidation lets you combine them with a few clicks, automatically adding up numbers from all ranges. But it’s not just for sums: you can also calculate averages, counts, or maximums. The real magic happens when your source data changes—say, the South region adds a new row. With consolidation, your summary can update instantly (if you link the source ranges). That means you’re always working with fresh, accurate totals. No more “Oops, I forgot to update the quarterly report!”
For a creative twist, think of consolidation as a data chef blending ingredients from different bowls. Need to merge budget data from 12 department sheets into one annual overview? Easy. What about combining employee attendance logs for several teams? Just point Excel to the ranges, and it “cooks” the results. Here’s a pro-level idea: use it to unify messy data from surveys where each question is in a separate sheet. By consolidating counts of “Yes” answers across sheets, you get a single dashboard of responses. Or, if you’re a teacher, combine test scores from different class sections into a gradebook summary. The possibilities are as endless as your imagination—no magic wand required, just the Consolidate tool under the Data tab.
Must Read
Ready to get your hands dirty? Here’s the step-by-step recipe. First, open a blank worksheet where you want the magic to happen. Go to the Data tab on the ribbon, and click the Consolidate button (it looks like three tiny spreadsheets with an arrow). A dialog box pops up—this is your command center. Choose a function, like Sum, Average, or Count. Then, click in the Reference box, highlight your first range (e.g., Sheet1!A1:B10), and click Add. Repeat for each range. If your data has labels (like month names or product IDs), check the boxes for Top row and Left column—Excel will match them automatically. Hit OK, and bam: your consolidated masterpiece appears.
But wait—there’s a twist! Forget linking ranges if you want a static snapshot; that’s fine for one-time reports. However, if your source data will grow or change, always check the “Create links to source data” box before clicking OK. This makes your consolidated table dynamic, meaning when you add rows to a source sheet, the summary updates (after you refresh). One golden tip: ensure all source ranges have the same layout. If one region’s sheet has “Jan” in row 1, keep it that way across all sheets. Mismatched labels cause Excel to leave blank cells—like a jigsaw puzzle with missing pieces. Also, watch out for hidden rows or filters; consolidation includes them by default, so double-check your source data.
 How to Use Consolidate in Excel to Easily Combine Data from Multiple
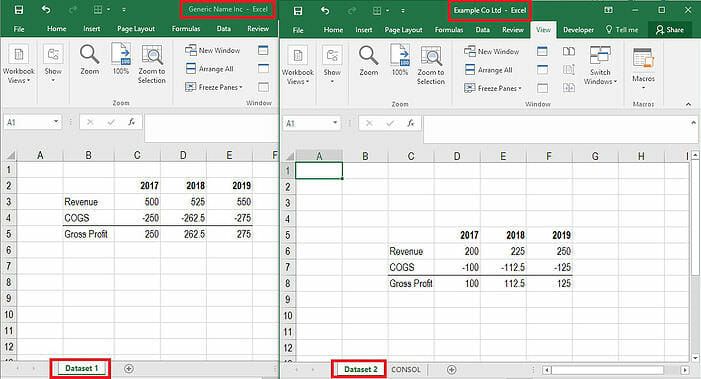
For advanced fun, try consolidating data from different workbooks. Click the Browse button in the Consolidate dialog to navigate to other Excel files. This is perfect for quarterly reports from colleagues or monthly financials from a server folder. Just remember: all source workbooks must be open for Excel to read them correctly. If you close a source file, the consolidation breaks—like a phone call dropping. To avoid this, copy all source data into a single master workbook on one sheet, then consolidate. That keeps everything connected and portable.
Before you go, here’s a sanity-saver: test on a small dataset first. Grab three mini tables with 5 rows each and practice. Also, be aware that consolidation doesn’t overwrite source data—it only creates a new summary. So you can play without fear of losing anything. And if you mess up? Undo (Ctrl+Z) is your best friend. Finally, remember that naming your ranges (using the Name Box or Name Manager) makes later consolidations easier—just type the name instead of highlighting cells. Excel consolidation is like a friendly robot that does the heavy lifting. Go ahead, give it a try, and watch your scattered data snap into perfect order. Your inner spreadsheet wizard will thank you!