How To Build A Mechanical Vape Mod

Alright, gather 'round, gather 'round, folks! Today, we're rolling up our sleeves and diving into the wild, wonderful world of mechanical vape mods. Now, I know what you're th...
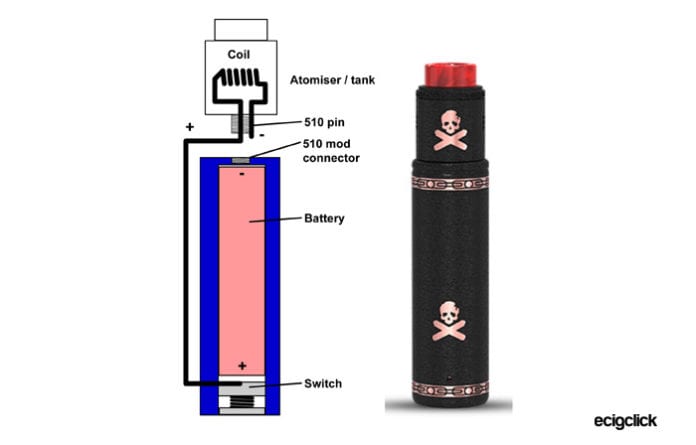
Alright, gather 'round, gather 'round, folks! Today, we're rolling up our sleeves and diving into the wild, wonderful world of mechanical vape mods. Now, I know what you're thinking, "But I'm just a humble vaper, not a mad scientist!" Well, fear not, my friend, because building a mechanical mod is like baking a cake - it's all about following the right recipe.
First Things First: What's a Mechanical Mod?
Imagine a mechanical mod as the bare-bones, stripped-down version of your average vape. It's just a tube with a battery in it, a button to press, and a coil to heat up your juice. No fancy chips, no screens, just pure, unadulterated vape power. It's like driving a go-kart when everyone else is in a Formula 1 race car. Simple, fun, and sometimes a little unpredictable.
Now, why would you want to build one of these contraptions? Well, for starters, it's cheaper than buying a pre-made mod. Plus, there's something incredibly satisfying about building something with your own two hands. It's like when you make your own pizza - sure, you could order one, but where's the fun in that?
Must Read
Gather Your Ingredients
Alright, let's talk supplies. You're gonna need:
- An 18650 battery - The powerhouse of your mod. Make sure it's a good quality one, none of that cheap, explodey stuff. Safety first, folks!
- A mod tube - This is the body of your mod. It can be stainless steel, brass, copper, or even wood. Whatever floats your boat.
- A button - The big, shiny thing you press to make your mod go. It's like the 'on' switch for your vape.
- A switch - This is what actually connects your battery to your coil. It's like the middleman in a bad deal - you need it, but you don't really want to talk to it.
- A 510 connector - This is the bit that connects your atomizer to your mod. It's like the USB port on your computer, but way more useful.
- A coil - This is what heats up your juice. You can buy pre-made ones, or make your own. More on that later.
- Wire - You'll need this to connect everything together. It's like the veins of your mod, carrying power from your battery to your coil.
- Screws and springs - These hold everything together and make sure your button works. They're like the unsung heroes of your mod.
Time to Get Cooking
Alright, let's start building. First, you'll want to insulate your battery. This is like putting a little coat on your battery to protect it from the cold, hard world. You can use heat shrink tubing, or even electrical tape. Just make sure it's well-insulated, or you might end up with a short circuit. And nobody wants that.
Next, you'll want to connect your battery to your switch. This is where you'll need your wire. Twist one end around the positive terminal of your battery, and the other around the positive post of your switch. It's like connecting two friends who've been avoiding each other at a party. Awkward, but necessary.
Now, connect your switch to your 510 connector. This is like introducing your switch to the rest of the party. They can finally meet your atomizer and become best friends. Twist the wire around the negative post of your switch, and the center pin of your 510 connector.
Next, assemble your button. This is like putting together a puzzle, but with fewer pieces and way more swearing. Follow the instructions that came with your button, and don't forget to put the spring in. Trust me, you don't want to press a button that doesn't spring back.
Finally, put it all together. Screw your button into the top of your mod tube, drop your battery, switch, and 510 connector inside, and screw on the bottom cap. It's like building a tiny, vapey LEGO house. And just like a LEGO house, it's gonna fall apart if you don't tighten the screws properly. So tighten those bad boys up!
 DIY BOX MOD | MECANICAL VAPE - YouTube
And Now, The Coil
Alright, you've built your mod, but it's not a vape without a coil. You can buy pre-made ones, but where's the fun in that? Let's make our own. You'll need some wire - kanthal or nichrome is good for beginners - and some cotton to wick it.
First, wrap your wire around a drill bit or a coil jig to make your coil. The tighter the wrap, the more power you can run through it. It's like making a tiny, vapey spring. Once you've got your coil, strip the insulation off the ends. This is like giving your coil a haircut. It might look weird at first, but it's for the best.
Next, install your coil in your atomizer. This is like giving your coil a new home. Wrap the ends of your coil around the posts, and tighten them down. Then, cut your cotton to size and thread it through your coil. It's like giving your coil a tiny, vapey blanket.
Finally, prime your coil. This is like giving your coil a test drive. Drip some juice onto your cotton, let it soak for a minute, then take a few dry hits. This helps to saturate your cotton and get your coil ready for vaping.
And That's How You Do It!
And there you have it, folks! You've just built your very own mechanical vape mod. It's like giving birth to a tiny, vapey baby. Now, go forth and vape responsibly. And remember, if it explodes, it's not because you did anything wrong. It's just... uh... testing the limits of science. Yeah, that's it.
Happy vaping, and remember: always follow safety guidelines when building and using mechanical mods. Because nobody wants to be the person who sets their vape on fire. Well, maybe that one guy does, but we don't talk about him.
