How Do You Draw A Leaf

Hey there, art enthusiast! Fancy grabbing a coffee and chatting about leaves? You know, those green, fluttery things that trees shed all over our sidewalks? Today, we're going...

Hey there, art enthusiast! Fancy grabbing a coffee and chatting about leaves? You know, those green, fluttery things that trees shed all over our sidewalks? Today, we're going to tackle the age-old question: How do you draw a leaf?
First things first: Why leaves?
Well, why not? They're everywhere, they're beautiful, and they come in a gazillion shapes and sizes. Plus, drawing leaves is like a gateway drug to the art world. Once you've mastered the humble leaf, you're ready to take on the world - or at least, a few twigs.
Let's talk basics: What's a leaf?
In simple terms, a leaf is a flat, green organ that plants use to make their own food. But for our purposes, it's a fun shape to draw. It's got a stem, a vein-y pattern, and a lovely, curvy edge. Easy peasy, right?
Must Read
Now, grab a pencil (or a stylus, if you're feeling fancy) and let's dive in!
Step 1: The basics - shape and line
Start by drawing a simple, elongated oval. This is the basic shape of most leaves. Don't worry about making it perfect - we're just trying to capture the essence here. Think of it as a leafy embryo, ready to grow and develop.
Next, add a line down the middle. This is the midrib, the leaf's backbone. It's the starting point for all those beautiful veins we'll add later.
Step 2: The stem and the serrations
At one end of your oval, draw a tiny line sticking out. This is the stem. It's the leaf's connection to the plant, and it's usually much smaller than the leaf itself.
Now, let's add some personality to our leaf. Draw a wavy line along the edge, creating little notches or 'serrations'. These are like the leaf's fingerprints, unique to each type. Some leaves have big, rounded serrations, while others have tiny, sharp ones. The world's your oyster!
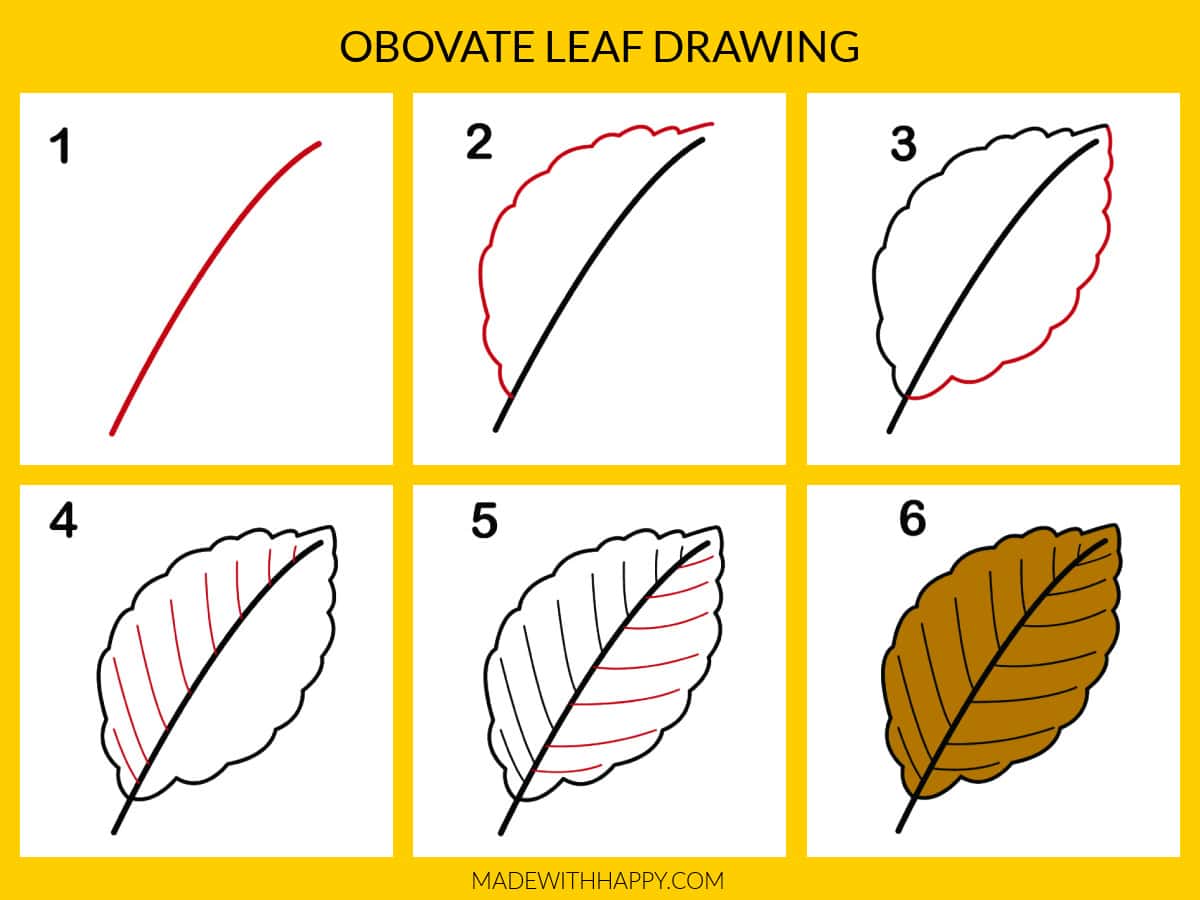 How To Draw A Simple Leaf
Step 3: The veins
Time to add some detail! Start at the bottom of the midrib and draw smaller lines branching out on either side. These are the secondary veins. Keep branching out, making the lines smaller and more numerous as you go.
You can stop here if you like, or keep going with even smaller veins. The key is to start big and work your way down. It's like drawing a tiny, leafy city map!
Step 4: The final touch - shading
Now that we've got our basic leaf shape and veins, let's give it some depth. Start by lightly shading the areas between the veins. This gives the illusion of the leaf's surface being raised, like a tiny, green mountain range.
Don't forget to shade the stem too! It might be tiny, but it's still part of the leaf. And remember, there are no mistakes in art, only happy accidents. If you shade too much, just call it 'drama' and move on.
And there you have it!
You've just drawn a leaf! High-five yourself (or give yourself a virtual pat on the back, if you're reading this in public).
Now, go forth and leaf it up! Draw a whole forest, or a leafy still life. The world is your canvas. And remember, practice makes perfect. Or at least, practice makes less terrible. Happy drawing!
